The success of Andy VK3YT's PS-x balloons down in the Southern Hemisphere which used WSPR, JT9 and JT65 transmissions to provide positional data from the middle of the ocean or across a half of the world led my interest towards the High Frequency (3-30MHz) part of the spectrum. Since I was in possession of only an RTL-SDR dongle which could operate just down to 24MHz, I turned my attention to upconverters.
Eventually I found DGK Electronics' nice and simple HF converter that I thought I could make on my own. The author provided a schematic upon which I designed a board in Eagle. I made only minor changes using USB micro connector to provide power and fitting the design inside a smaller PCB.
The device is built around Mini-circuits' ADE-1 mixer and a 100MHz local oscillator. The RF input first passes through an Elliptic low-pass filter with 65MHz cutoff frequency. The low frequencies that are allowed through then mix with the 100MHz signal generated by the oscillator. This essentially moves a signal, say, at 7MHz to 107MHz which is well within the RTL-SDR dongle's range. The output of the mixer is filtered by a 7th-order Butterworth filter with a passband of 100-171MHz. The local oscillator is powered by 3.3V (regulated USB supply) and equipped with a band-pass filter as well. The Eagle files can be downloaded from here Upconverter v1.0.sch and here Upconverter v1.0.brd.
I also came across nice little aluminium boxes on Ebay that could be used to shield the PCB. It took a little fitting since it hadn't originally been designed for the box and the hand drilled openings ended up a bit rough but in the end it served the purpose sufficiently.
This specific case was 25 x 25 x 40mm for maximum two PCBs of 40 x 22.5 x 1.6mm in size. Many more cases of different dimensions can be found on Ebay.
The next piece of the setup was an antenna. Generally, lower in frequency one goes larger the antenna tends to get. At HF the wavelength, which is a measure playing a core role in many antenna designs, ranges from 10m (30MHz) to 100m (3MHz). That often leads to 10s of meters of wire hung among trees and houses. Not the way I wanted to go. Some googling time later I found Magnetic Loop Antennas. With about 1/10 wavelength of circumference and a possibility to tune the antenna with a capacitor, this seemed like an ideal space-saving solution.
I wanted the antenna to cover the 20m, 30m and 40m bands so roughly from below 7MHz to about 15MHz. A great resource in the design for me was AA5TB's website with his experiences and all the necessary calculations included. A loop antenna consists of about 1/10 wavelength resonant loop, a tuning capacitor and a coupling loop which is responsible for the 50Ω output. I based the design of my antenna on knowing that the tuning capacitor I had managed to get hold of had a range of 540pF. That and the desired range served as inputs to the following computations.
I arrived at conductor length S for the resonant loop of 1.995m using copper tubing with diameter d of 15mm. That yielded area A of 0.317m2. Unfortunately the equations don't use SI units. Conversions to MHz in case of frequency f, to feet in case of conductor length S, to inches in case of conductor diameter d and square feet in case of loop area A need to be done first. Taking that into account the antenna has efficiency of only 3.13% at 7MHz and 31.75% at 15MHz. Not great, but hey.
This set of equations gives the required capacitance of the tuning capacitor at specific frequency. First the loop inductance of 1.519uH is calculated. That yields inductive reactance of 66.81Ω at 7MHz and 143.17Ω at 15MHz. Using these values I arrive at 340pF at 7MHz and 74pF at 15MHz of required capacitance. Both values lie within the range of the tuning capacitor. The full range of the capacitor spans from 5.6MHz to somewhere close to 30MHz (depends on its minimum achievable capacitance).
The last calculation addresses the bandwidth of the antenna at specific frequency. First the quality factor Q is calculated to 1108.04 at 7MHz and 1142.85 at 15MHz. The bandwidth Δf then amounts to 6317Hz at 7MHz and 13125Hz at 15MHz. Quite narrow as well. Looking at the whole design now, I would probably focus more on efficiency and build a bigger resonant loop. However, what is done, is done.
The tuning capacitor I used was Tesla WN704-13 with two outputs of maximum 270pF and two more of 22.5pF. I wired the two 270pF outputs in parallel to get 540pF of total capacitance. The capacitor goes between the two ends of the tubing and connects them. As clearly visible in the image it wasn't easy to solder the leads to the copper. I tried to get hold of a knob that would fit the grip on the capacitor but unsuccessfully. Thus a bottle lid had to be given the job instead (it works fine).
The coupling loop is made of a 50Ω coaxial cable and is 1/5 of the resonant loop in diameter. It is terminated in an SMA connector.
I wanted the antenna to be self-standing and easily portable so I equipped it with a simple stand. It puts the lower edge of the loop at 0.7m above ground.
Tuning can be done looking at the frequency spectrum in SDR# or a similar software that visualizes the data.
Recently I bought the more stable TCXO equipped RTL-SDR Blog v3 to replace the cheapest dongle available I had been using. Here it is in my completed HF setup.
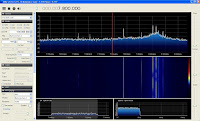
A few examples of reception with the antenna in a room inside a house. These are AM radios at 7MHz.
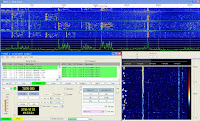
Several WSPR receptions on 40 meters. The furthest I've managed was from The Canary Islands at about 3700km.
JT9 and JT65 receptions work fine as well. Although I've managed receptions in all three bands: 40m, 30m and 20m, 7MHz seem to produce the most successful decodes for me.


No comments:
Post a Comment